첫 번째 챕터에서 구현한 pub hello_world() 함수는 “Hello World” 문자열을 반환하는 단순한 Rust 코드이며, 본래 Rust는 별도의 실행 환경(Runtime)을 필요로 하지 않는 언어이다. 하지만 컴파일된 Wasm 바이너리는 ‘Wasm 런타임’ 위에서 동작하는 것을 전제로 설계되기에, 해당 환경을 통해서만 외부와 통신할 수 있다.
따라서 Rust의 표준 라이브러리에 추가적으로, 실행 환경과의 인터페이스를 연결해 줄 별도의 라이브러리(예: wasm-bindgen) 가 필요하다. Wasm의 대표적인 실행 환경인 웹브라우저에서는 자바스크립트 엔진을 거쳐 브라우저 API에 접근함으로써 실제 기능을 수행하게 된다.
본 챕터에서는 wasm-bindgen을 통해 자바스크립트 엔진과 소통하는 방법을 살펴보고, 더 나아가 브라우저 API를 활용해 Wasm 모듈 내부의 결과물을 사용자에게 전달하는 과정을 보도록 하겠다. 또한, 효율적인 개발과 빌드 통합을 위한 wasm-pack 사용법과, Rust의 비동기(Asynchronous) 환경을 브라우저와 연결해 주는 wasm_bindgen_futures에 대해서도 보도록 하겠다.
🔗1. Wasm-bindgen
Wasm-bindgen은 WASM 모듈과 브라우저 런타임안의 자바스크립트 엔진 사이를 연결해주는 역활을 한다.
🔗1.1 wasm_bindgen 을 이용하여 Wasm 파일 만들기
프로젝트 생성
> cargo new --lib hello-worldCargo.toml 과 src/lib.rs 을 다음의 파일들로 바꾸어 보도록하자.
Cargo.toml
[package]
name = "hello-wasm"
version = "0.1.0"
edition = "2024"

[lib]
crate-type = ["cdylib"]

[dependencies]
chrono = "0.4"
wasm-bindgen = "0.2"
앞서 생성했던 Cargo.toml과 다른 점은 dependencies에 chrono와 wasm-bindgen이 추가되었다는 것이다. chrono는 Rust에서 현재 시간을 가져오는 예제 로직을 구현하기 위해 사용하며, wasm-bindgen은 Rust로 빌드된 WASM 파일이 런타임을 통해 외부 자바스크립트와 통신할 수 있게 해주는 핵심 라이브러리이다.
src/lib.rs
use chrono::Local;
use wasm_bindgen::prelude::*;

#[wasm_bindgen]
  extern "C" {
      fn alert(s: &str);
  }

#[wasm_bindgen]
  pub fn now() -> String {
      Local::now().to_rfc3339()
  }

#[wasm_bindgen]
  pub fn pop_message(msg: &str) {
      alert(msg)
  }

#[wasm_bindgen]
  pub fn add(a: f64, b: f64) -> f64 {
      a + b
  }
#[wasm_bindgen] 매크로가 적용된 함수들은 추후 자바스크립트에서 호출될 함수들이다. 현재 시간을 반환하는 now(), 자바스크립트의 alert() 창을 띄우는 pop_message(&str), 그리고 더하기 연산을 수행하는 add(f64, f64) 함수를 확인할 수 있다.
Wasm 파일 만들기
❯ cargo build --release --target wasm32-unknown-unknown
Finished `release` profile [optimized] target(s) in 0.16starget/wasm32-unknown-unknown/release/hello_wasm.wasm을 확인할 수 있다.
🔗1.2. wasm-bindgen으로 java(type)script bind 파일 만들기
wasm-bindgen은 러스트 크레이트(Crate)인 동시에 CLI 도구이기도 하다. 크레이트로서의 wasm-bindgen은 컴파일러가 생성한 WASM 파일과 자바스크립트 사이의 상호 운용성을 담당하며, CLI 도구는 빌드된 WASM을 가지고 자바(타입)스크립트에서 손쉽게 호출할 수 있도록 해주는 바인딩 파일을 자동으로 생성해 준다.
설치하기.
> cargo binstall wasm-bindgen-cli혹은 wasm-bindgen 리포지토리 에서 코드를 가져와 직접 빌드해도 된다.(추천)
> git clone --depth 1 https://github.com/wasm-bindgen/wasm-bindgen.git && cd wasm-bindgen
> cargo build --release --package wasm-bindgen-cli
> install -s -Dm755 target/release/wasm-bindgen -t ~/.cargo/bin
이제 앞서서 만든 wasm을 가지고 wasm-bindgen 명령어를 이용하여 브라우저에서 wasm파일을 호출하게 해주는 자바(타입)스크립트를 생성해보자.
> wasm-bindgen ./target/wasm32-unknown-unknown/release/hello_wasm.wasm --target web --out-dir ./pkgtarget이 web이고 pkg 디렉토리에 결과물을 생성한다.
❯ eza --tree pkg/
pkg
├── hello_wasm.d.ts
├── hello_wasm.js
├── hello_wasm_bg.wasm
└── hello_wasm_bg.wasm.d.ts
pkg/hello_wasm.js 파일을 열어보면, 자바스크립트 환경에서 바로 호출할 수 있도록 내보내기(export)된 Wasm(Rust) 함수들을 확인할 수 있다. 자바스크립트와의 연동을 위해 개발자가 일일이 함수 인터페이스를 재정의할 필요가 없다는 것이 큰 장점이다. 이는 wasm-bindgen이 복잡한 연결 코드를 자동으로 생성해주기 때문이다.
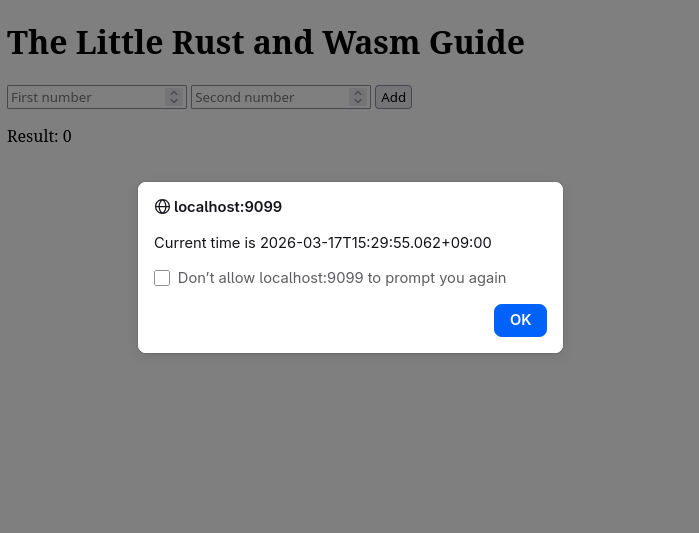
이제 웹 환경에서 실제로 호출할 index.html 파일을 생성할 차례이다. 프로젝트 루트(root), 즉 Cargo.toml 파일이 위치한 디렉터리에 index.html 파일을 생성한다.
index.html
<!DOCTYPE html>
<html>
  <head>
    <meta charset="utf-8">
    <title>The Little Rust and Wasm Guide</title>
  </head>
  <body>
    <script type="module">
      import init, {now, pop_message}
      from './pkg/hello_wasm.js';

      async function run() {
        await init();
        pop_message("Current time is " + now());
      }

      run();
    </script>

    <h1>The Little Rust and Wasm Guide</h1>
    <form id="sumForm">
      <input type="number" id="num1" placeholder="First number" required>
      <input type="number" id="num2" placeholder="Second number" required>
      <button type="submit">Add</button>
    </form>

    <p>Result: <span id="result">0</span></p>

  <script type="module">
   import init, { add }
      from './pkg/hello_wasm.js';

    const form = document.getElementById('sumForm');
    const resultDisplay = document.getElementById('result');

    form.addEventListener('submit', (event) => {
      event.preventDefault();
      const val1 = document.getElementById('num1').value;
      const val2 = document.getElementById('num2').value;

      const sum = add(val1, val2);

      resultDisplay.textContent = sum;
    }
    );
  </script>

  </body>
</html>
miniserve`로 이제 준비된 파일들을 서비스 해보자.
> miniserve -p 9099 --index index.html .웹브라우저에서http://localhost:9099 를 확인해보자.
miniserve가 모죠?
Miniserve: a CLI tool to serve files and dirs over HTTP
https://github.com/svenstaro/miniserve🔗2. wasm-pack
wasm-pack은 앞에서 본 cargo init, wasm-bindgen 등의 커맨드들을을 하나의 툴로 묶어 개발을 좀더 편하게 해준다. wasm-pack을 설치해서 개발을 할경우 따로 wasm_bindgen은 설치하지 않아도 된다.
🔗2.1 설치
인스톨러 혹은 직접 빌드해서 설치한다.
> git clone --depth 1 https://github.com/drager/wasm-pack.git && cd wasm-pack
> cargo build --release
> install -s -Dm755 target/release/wasm-pack -t ~/.cargo/bin
설치 후 help 커맨드로 사용법을 볼수있다.
❯ wasm-pack help
📦 ✨ pack and publish your wasm!
Usage: wasm-pack [OPTIONS] <COMMAND>
Commands:
build 🏗️ build your npm package!
pack 🍱 create a tar of your npm package but don't publish!
new 🐑 create a new project with a template
publish 🎆 pack up your npm package and publish!
login 👤 Add an npm registry user account! (aliases: adduser, add-user)
test 👩🔬 test your wasm!
help Print this message or the help of the given subcommand(s)
Options:
-v, --verbose... Log verbosity is based off the number of v used
-q, --quiet No output printed to stdout
--log-level <LOG_LEVEL> The maximum level of messages that should be logged by wasm-pack. [possible values: info, warn, error] [default: info]
-h, --help Print help
-V, --version Print version🔗2.2. wasm-pack을 이용한 프로젝트 생성
❯ wasm-pack new hello-wasm
[INFO]: ⬇️  Installing cargo-generate...
🐑  Generating a new rustwasm project with name 'hello-wasm'...
🔧   Destination: /tmp/hello-wasm ...
🔧   project-name: hello-wasm ...
🔧   Generating template ...
[ 1/14]   Done: .appveyor.yml
[ 2/14]   Done: .github/dependabot.yml
[ 3/14]   Done: .github
[ 4/14]   Done: .gitignore
[ 5/14]   Done: .travis.yml
[ 6/14]   Done: Cargo.toml
[ 7/14]   Done: LICENSE_APACHE
[ 8/14]   Done: LICENSE_MIT
[ 9/14]   Done: README.md
[10/14]   Done: src/lib.rs
[11/14]   Done: src/utils.rs
[12/14]   Done: src
[13/14]   Done: tests/web.rs
[14/14]   Done: tests
🔧   Moving generated files into: `/tmp/hello-wasm`...
🔧   Initializing a fresh Git repository
✨   Done! New project created /tmp/hello-wasm
[INFO]: 🐑 Generated new project at /hello-wasm
>
생성된 프로젝트의 구조
❯ eza --tree hello-wasm
hello-wasm
├── Cargo.toml
├── LICENSE_APACHE
├── LICENSE_MIT
├── README.md
├── src
│   ├── lib.rs
│   └── utils.rs
└── tests
└── web.rs🔗2.3 코드 작성
wasm_bindgen의 예제에서 만든 Cargo.toml 과 src/lib.rs를 그대로 가져와 이용한다.
🔗2.4 빌드
wasm-pack 을 이용하여 build를 해본다. --target은 web으로 하면 기본설정으로 정의된 pkg 디렉토리에 빌드된 파일을 생성해준다. wasm_bindgee 때와는 달리 따로 사전에 cargo로 wasm파일을 빌드하지 않아도 wasm 파일 빌드와 자바(타입)스크립트 바인딩파일이 자동으로 생성된다.
> wasm-pack build --target web빌드후 pkg 폴더의 모습
❯ eza --tree pkg/
pkg
├── hello_wasm.d.ts
├── hello_wasm.js
├── hello_wasm_bg.js
├── hello_wasm_bg.wasm
├── hello_wasm_bg.wasm.d.ts
├── package.json
└── README.md🔗2.5 htlm에서 호출과 결과 보기
wasm_bindgen에 서와 같이 index.html을 생성해주고 웹서버를 이용해 확인한다.
wasm_bindgen을 통한 결과와 같은 내용을 활인할 수 있을것이다. wasm-pack 은 Cargo 와 wasm_bindgen을 통해 각각 하던 작업은 하나로 통합함으로서 개발의 효율성을 추구할 수 있다.
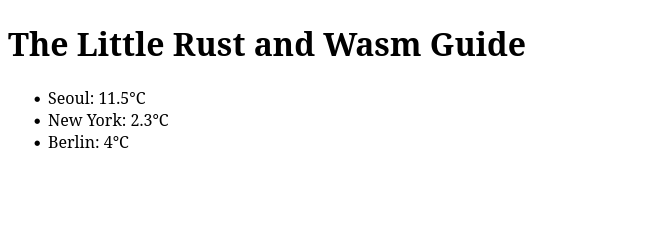
🔗3. wasm_bindgen_futures
wasm_bindgen_futures는 자바스크립트은 Promise와 러스트의 Futures를 서로 연동시켜준다.
그럼 러스트의 Reqwest 크레이트를 이용하여 서울, 뉴욕, 베를린의 현재 기온을 Open Metro의 날씨 API를 통해 가져와 웹브라우저에 보여주는 예제를 만들어보자.
Cargo.toml
[package]
name = "hello-wasm"
version = "0.1.0"
edition = "2024"

[lib]
crate-type = ["cdylib"]

[dependencies]
reqwest = "0.13.2"
wasm-bindgen = "0.2.114"
wasm-bindgen-futures = "0.4.64"
src/lib.rs
use reqwest::{self, StatusCode};
use wasm_bindgen::prelude::*;

#[wasm_bindgen]
pub async fn get_http(url: String) -> Result<String, JsError> {
    let client = reqwest::Client::new();

    let res = client
        .get(&url)
        .send()
        .await
        .map_err(|e| JsError::new(&format!("Request failed: {}", e)))?;

    if res.status() == StatusCode::OK {
        let text = res
            .text()
            .await
            .map_err(|e| JsError::new(&format!("Text parse failed: {}", e)))?;
        return Ok(text);
    }

    Err(JsError::new(&format!("HTTP Error: {}", res.status())))
}
index.html
<!DOCTYPE html>
<html>
<head>
<meta charset="utf-8">
<title>The Little Rust and Wasm Guide</title>
</head>
<body>
<script type="module">
import init, {get_http}
from './pkg/hello_wasm.js';
const cities = [
{ name: "Seoul", url: "https://api.open-meteo.com/v1/forecast?latitude=37.566&longitude=126.9784¤t=temperature_2m&timezone=Asia%2FTokyo"},
{ name: "NewYork", url: "https://api.open-meteo.com/v1/forecast?latitude=40.7143&longitude=-74.006¤t=temperature_2m&timezone=Asia%2FTokyo"},
{ name: "Berlin", url: "https://api.open-meteo.com/v1/forecast?latitude=52.5244&longitude=13.4105¤t=temperature_2m&timezone=Asia%2FTokyo"},
]
async function run() {
await init();
for (const city of cities) {
try {
const weather = JSON.parse(await get_http(city.url));
const temp = weather.current.temperature_2m;
const unit = weather.current_units.temperature_2m;
document.getElementById(city.name).innerText = `${temp}${unit}`;
} catch (err) {
console.error("Rust Error:", err);
}
}
}
run();
</script>
<h1>The Little Rust and Wasm Guide</h1>
<ul>
<li>Seoul: <span id="Seoul">Loading...</span></li>
<li>New York: <span id="NewYork">Loading...</span></li>
<li>Berlin: <span id="Berlin">Loading...</span></li>
</ul>
</body>
</html>브라우저 결과
Another fun thing?: Raw API bindings for Web APIs